This chapter contains the following topics:
This program allows you to enter and maintain quotations, customer orders, and credit memos. Orders may also be entered directly as invoices allowing you to by-pass the selection process later. The invoicing option is useful in a company that has occasional Point of Sale transactions.
Some options set in the C/O Control information will manage the way you use this program. These include:
| • | The ability to set a sales Lead-Time. This allows the program to calculate an estimated Required Shop Date automatically. |
| • | You can optionally specify a ship-zone for your ship-to addresses or can use this as an additional field in the ship-to address. |
| • | For orders that make product to customer order, you may optionally create shop orders from the sales order lines. |
| • | Whether or not sales reps or commissions are used. |
| • | Whether or not you’d like to have the ability to split commissions. |
| • | Whether or not you’d like to use product certifications. |
| • | Whether or not you’d like to use and/or save sales order line comments. |
| • | Whether or not you’d like to enter multiple release sales order lines. |
These settings will impact fields you may access in this program and may also directly impact how information is posted to the accounting modules so be sure you carefully consider your settings.
Select
Enter from the Customer orders C/O menu.
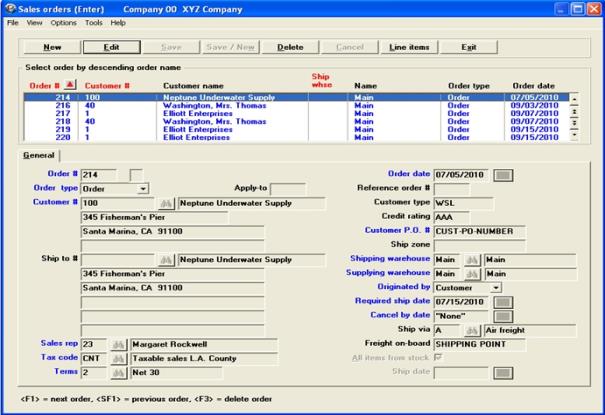
The following screen displays:
The are three screens for entering and order: Header, Lines and Summary screens. The first screen is the Header.
The list box displays up to 6 unposted sales orders at a time. You may sort the sales orders by order number, customer number or warehouse number, all in ascending or descending order. Only column names in red may be sorted. Click on the column name or the arrow to the right of the column name to change the sort or use the View options.
To locate a sales order, start typing the sales order number, customer number or warehouse number, depending on which sort field is selected. You may also use the up/down arrows, Page up, Page down, Home and End keys to locate a sales order. The <F1> and <SF1> function the same as the up/down arrow keys.
Sales orders that display in the list box are available for changes or deletion. The fields for the selected sales order display in the lower part of the screen.
When a sales order is found, you may select the <Enter> key or Edit button to start editing.
There is a row of buttons on all three screens you will have some or most of the following options:
| Button | Keyboard | Button Description |
|---|---|---|
| New | Alt+n | For entering a new order. |
| Edit | Alt+e | For editing an existing order. This option is only available if there are orders on file. |
| Save | Alt+s | To save a new entry or the changes made to an edited entry. |
| Save/New | Alt+w | To save a new entry or the changes made to an edited entry and start a new order. |
| Delete | Alt+d | To delete an existing order. |
| Cancel | Alt+c | To cancel adding or editing an existing order. |
| Line items | Alt+l | To access the line items screen for an existing order. |
| Exit | Alt+x | To exit the screen. |
Menu Selections
At the top left of the screen menu selections are available. Most of these are the same from screen to screen. The selections that are unique to this screen are Enter/maintain product structures, Copy product structure, Enter maintain routing, Copy routing, Update item/labor burden, Total cost rollup, Inventory availability and P.O. entry. These are explained in other manufacturing documents.
Enter the following fields:
Entry Format: To add an order, enter spaces to assign the next available Order Number from Control information, or you may enter a new Order Number up to 6 numeric digits.
If the order has been partially shipped, a Backorder Number will display to the right of the Order Number.
Entry Format: 6 numeric digits in MMDDYY format, or press ENTER to accept the default System Date displayed.
Comments: Use Invoice only if you want to immediately invoice the order entered. Order Types CR memo and Invoice are automatically selected to bill in your next invoice print run. An order with Order Type is not invoiced until after it is selected for billing with the Billing function. See the Billing chapter.
If you enter quote you may later convert the Quote to an Order or Invoice by changing this field.
|
Format |
Drop down list box with the choices of Order, Cr Memo, Invoice and Quote, Order is the default. |
If you select CR memo for Order Type, you are next prompted to enter:
Comments: Specifies the Invoice Number to which the Credit Memo will be applied. If you leave this entry blank, the credit will be applied to the account but not to a specific invoice.
|
Format |
Up to 6 numeric digits or space. |
Comments: Specifies the original Order Number to which this Credit Memo refers.
|
Format |
Up to 6 numeric digits or space. |
Entry Format: Up to 12 alphanumeric characters, or space to lookup the customer by name.
If you use the name lookup option, type in any portion of the Customer Name, up to 25 alphanumeric characters. The program finds the first name in A/R Customers matching the characters you typed in. If a match is found the full customer name, address, and Customer Number will display and you will be prompted to answer "Right customer ?". Answer Y or N, or press <F1> to get the next Customer Name on file that matches your entry. If in the name lookup routine you enter space in Customer Name, the cursor will move back to the Customer Number entry position.
Validation: Must match a record in A/R Customers.
If the answer in Control Information is Y to 21. Order entry access to customer file ?, and the Customer Number entered is not on file, the program will ask if you wish to add the Customer record. Answer Y to go directly to the Customer maintenance program and add the new Customer record, after which you will be returned to the order entry screen.
Comments: When you retrieve an order on file, you are not allowed to change this field.
The Customer Type is displayed to the right of the Customer Number.
If the customer Credit Limit is exceeded by the customer's Account Balance plus Unposted Balance (unbilled orders on file less unposted cash receipts on file), the program warns you of this condition. A general user will not able to proceed with the order. An administrative user can override the credit limit.
If the customer is on credit hold, then you will not be able to enter a new order, invoice credit memo or quote for that customer until the credit hold is removed.
If the Customer Credit Rating code is not spaces, this Credit Rating is displayed on the screen.
Customer Name and Address lines
Entry Format: Two lines of up to 25 characters each plus two lines of up to 31 characters each.
These fields are automatically entered from the Customer record. You may use "Field number to change ?" to modify these fields.
Entry Format: Up to 8 alphanumeric characters.
Comments: Press ENTER to use the Customer Name and Address as the Ship-to Name and Address. Enter a Ship-to Number to use a Ship-to Address in the Ship-to Addresses File for the customer. Or, press <F1> to display the first record in the Ship-to Addresses File for this Customer.
If you press <F2> you are allowed to enter any Ship-to Address. The <F2> option to enter a shipping address different from the billing location will not permit historical Sales Analysis by ship-to location; a Ship-to Number must be used to accommodate such subsequent analysis.
If you enter a Ship-to Number or press <F1> , you will be asked "Right Ship-to ?". The default answer is "Y". Press ENTER to accept the default, press <F1> for the next Ship-to Address, or enter "N".
Ship To Name and Address lines
Entry Format: Five or six lines of up to 31 characters each. All spaces allowed in any line.
Comments: If the 6. Ship to zones used ? flag in Control Information is set to "Y", five lines (Fields 9 - 13) are available for the Ship-To Name and Address and the sixth (Field 14) is used for Shipping Zone.
These lines are automatically entered unless you press <F2> at Ship-to Number, in which case, you will make the entries at each line.
(if Shipping Zones are used)
Entry Format: Up to 10 alphanumeric characters, or press ENTER to accept the default that is displayed.
Comments: If the Ship-to Address is the same as the Bill-to Address, then the Shipping Zone default displayed is the first 10 characters of the Comments field in the Customer record. If the Ship-to Address is from the Ship-to Addresses File, then the default is the Shipping Zone field from the Ship-to Addresses File.
If the "Shipping zones used ?" answer in Control Information is set to "N", this line is used as an optional sixth Ship-to Address line of 31 characters in length.
Entry Format: Up to 3 alphanumeric characters, or press ENTER to accept the displayed Sales Rep Number. The displayed default is either from the Customer record or the Ship-to Addresses record if you entered a Ship-to Number.
Validation: Must match a Sales Rep on the Sales Rep File. The Sales Rep name is displayed.
Comments: This entry is bypassed if you answered N to "Sales reps used ?" in Control Information.
Entry Format: Up to 3 alphanumeric characters. This field is automatically entered from the Customer record, or the Tax Code from the Ship-to Addresses record if you entered a Ship-to Number.
Validation: Must match a Tax Code in the Tax Code File. The Tax Code description is displayed.
Entry Format: Up to 3 alphanumeric characters. This field is automatically entered from the Customer record.
Validation: Must match a Terms Code in the Terms Code File. The Terms Code description is displayed.
(Customer Purchase Order Number)
Entry Format: Up to 15 alphanumeric characters, or <F1> = "SEE BELOW". Space not allowed.
If the PO Number exceeds 15 characters, you may press <F1> . You will later be prompted to enter a PO Number, up to 25 characters, in the first Order Comment line at the end of the order. When the order is billed, this longer PO Number will be posted to the A/R reference field in the Sales Journal (normally Order Number is put in A/R reference).
Entry Format: Up to 2 alphanumeric characters, or Blank = "Main" warehouse.
Validation: If not "Main", entry must match a record in the I/M Warehouse Codes File. The Warehouse description is displayed.
Comments: You are only allowed to change the Shipping Warehouse when you add the order.
Entry Format: Up to 2 alphanumeric characters, press ENTER to default to the Ship from Warehouse, or Blank = "Main", or <F1> = "See lines".
Validation: If not "Main", must match record in the I/M Warehouse Codes File.
Comments: If a warehouse is specified, it will be the automatic default Supplying Warehouse for line items later added to the order. If "See lines" is entered here, you will later be prompted to enter a Supplying Warehouse for each line.
Entry Format: Drop down list with the choices of Customer, Sales Rep and EDI.
Default: Customer is the default entry displayed.
Comment: EDI may display in this field if the order was created with an EDI interface.
Entry Format: 6 numeric digits in MMDDYY format, press ENTER to accept the default date displayed, <F1> = "Hold", or <F2> = "See lines".
Comments: If there is a value in Control Information for Standard Lead Time Days, then for a new order the displayed default is determined by the current system date plus Standard Lead Time Days, with the Schedule Exception Days considered. If a specific date or "Hold" is entered here, then that will be the automatic default Ship Schedule Date entry for line items subsequently added to the order. If "See lines" is entered here, you will enter a Ship Schedule Date for each line item added to the order.
If this date is changed for a previously entered order, the program will ask:
Change ship date for all open line items ?
A Yes answer will change the Ship Schedule Date for the order's open line items to this date.
Entry Format: 6 numeric digits in MMDDYY format, or Blank = "None".
Comments: The Cancel By Date is printed on the Packing List and indicates that the customer wants the order to be canceled if not shipped by this date.
(Code/description)
Entry Format: Up to 3 alphanumeric characters for Code, or accept the Code displayed from the Customer record, or spaces in Code to allow entry of a Ship Via Description up to 15 characters.
Validation: Any Code entry must match a Ship Via Codes record, for which the description displays.
Entry Format: Up to 15 alphanumeric characters, or accept the Default F.O.B. location from Control Information, or <F1> = "Free freight".
Comments: If "Free freight" is selected, then you are not allowed to enter a freight amount on the Order Summary Screen in the entry or billing functions.
Entry Format: Check box, checked is yes and unchecked is no, or accept the default from Control Information.
Comments: If checked, then during line item entry the Quantity From Stock field will automatically be the same as the Quantity To Ship and the Quantity From WIP will automatically be zero. If unchecked, then you can enter any value for the Quantity From Stock, and Quantity From WIP will be calculated as the Quantity To Ship less the Quantity From Stock.
If the Order Type is Invoice, you will also be prompted to enter:
Entry Format: 6 numeric digits in MMDDYY format.
When your entries are correct, the program will display the order line item screen.
Use the following procedure to enter order line items. When at the Line Number entry, you may also choose to enter an Assortment, or to display all of the line items already entered on the order. Here is an example of the line item screen:
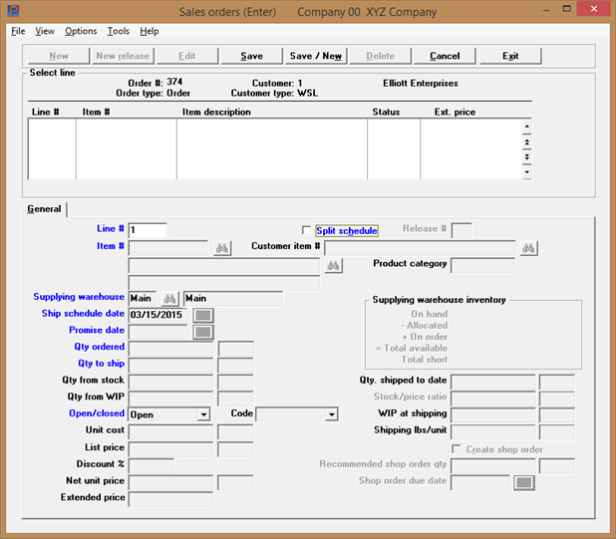
Enter the following fields:
Line number is automatically generated. You may change it as long as it does not match a line number for the order being added or edited.
Enter up to 3 numeric digits to change a previously entered line, press <F5> to get a review display of all lines already entered on the order, or type 999 to enter an Assortment.
Press ESC (or TAB) at this position when you are done adding or changing line items.
If you are adding a Line Number, and the answer is Y to "Use split schedules for some order items ?" in Control Information, you are next prompted to answer:
Entry Format: Check box, checked is yes and unchecked is no. Check the box if you wish to enter multiple shipment schedule releases for this Line Number.
If this box is checked, you must then enter:
Entry Format: Up to 2 numeric digits, or press <F1> to bring up next Release Number already on file for the line.
Default: When you first add a new Line Number with split schedules, defaults to 1. When you consecutively add another release for the same Line Number during the same entry session, defaults to value of the previous Release Number plus 1. If you enter a Line Number already on file with split schedules, this value defaults to first Release Number on file for the line.
Comments: The split release feature permits easy entry of multiple scheduled shipment quantities for the same order line item. When you consecutively enter multiple releases for a Line Number, you do not have to enter the Item Number for each release after the first release is entered. Each release for the same Line Number must be assigned a unique Shipping Schedule Date. The quantity ordered and list price entries default to the values for the preceding release, but may be changed.
Entry Format: Up to 15 alphanumeric characters.
To lookup an Item by Description, enter spaces in this field to go to the first Item Description line. You may then type in any portion of the Item Description, up to 30 alphanumeric characters. The program will find the first record on the Item Master File that matches the characters you typed in. If a match is found the full Item Description will display and you will be prompted to answer "Right item ?". Answer Y to complete the Item Number entry, or press <F1> to search for the next Item with a Description that matches the characters you entered, or answer N to go back to the Description entry position. Enter space at Description to return to the Item Number field.
When you enter a valid Item Number that begins with an *, the program will treat this as a "miscellaneous" item. For such miscellaneous items, you must enter the full Item Description and List Price for the line item.
Validation: The Item Number must exist in the I/M Item Master File.
After the Item Number is entered, the Product Category from the Item Master is displayed. If Control Information indicates that sales rep commissions are used, the line item Commission Percent, if any, is automatically calculated and displayed. The Sales Rep, Customer Type, and Item Product Category are used to determine the Commission Percent from the Sales Rep Commission Rates File.
Entry Format: One or two lines of up to 30 alphanumeric characters each. An entry of all spaces not allowed on the first line, but is allowed in the second.
These fields are automatically entered from the Item Master record, unless a "miscellaneous" Item Number beginning with * has been entered. Use "Field number to change ?" to modify these description entries.
This field is the customer's item number and if it exists, was assigned using EDI items. It cannot be changed on this screen. If there is no assigned customer item the field displays as "Not available", however you may enter a customer item number here.
Once you enter in the item in the Item # field, from your item master database, you will be given an opportunity to enter a customer item number if it does not already exist. Type a number into this field and the program will ask you if you’d like to add it. Simply click Yes and the item will be added to the database automatically for you.
Entry Format: Up to 2 alphanumeric characters, or
Blank = "Main".
Validation: Must match either the Primary Warehouse in the Item Master record, or a Branch Warehouse Item record for this Warehouse Code and the Item Number. If it is not, an error message is displayed.
Comments: This field is automatically filled if there is a specific Supplying Warehouse specified on the first order entry screen. If you entered "See lines" as the Supplying Warehouse on the first screen , then you will be required to enter this field for each line item.
When shipment quantities and billing amounts for the order are posted in Billing, the line item Supplying Warehouse will be credited with the sale of the line item. Any part of the line item shipment quantity that is specified as Quantity From Stock will be deducted from the Supplying Warehouse inventory Quantity On Hand when the shipment is posted.
After a valid Supplying Warehouse is entered, the Item Number inventory status is displayed showing On Hand, Allocated, On Order, and Total Available values for this Supplying Warehouse.
Entry Format: 6 numeric digits in MMDDYY format, or
<F1> = "Hold".
Default: The Shipment Schedule Date is automatically entered as the Requested Ship Date from the first screen, unless the Requested Ship Date was "See lines".
Entry Format: 6 numeric digits in MMDDYY format.
Default: If there is a Shipment Schedule Date, it automatically appears as the default. If the Shipment Schedule Date is "Hold", then the Promise Date is automatically entered as "None".
Comments: "On time" shipment performance will be measured against the Shipment Schedule Date, or the Promise Date, based on the specification in Control Information.
This value, up to 4 numeric digits and 3 decimals, is displayed only if the Price Unit of Measure differs from Stock Unit of Measure for the Item Number. The ratio and both Units of Measure are shown.
Order quantities are entered in the Stock (Inventory) Unit of Measure. Unit Price data are in the Price Unit of Measure.
Qty for credit
Entry Format: Up to 8 whole digits, or 6 numeric digits and 3 decimals, or press ENTER to default to Quantity Ordered of one. A minus sign is not allowed.
Do not enter a minus quantity for Credit Memos. Using the Order Type (type = C) the quantities and extended amounts shown will automatically be credited.
Comments: This quantity is in the Price Unit Of Measure. For Credit Memos, it is the Quantity used to calculate the Credit dollar amount, not the physical Quantity Returned by the customer which may optionally be entered in the next field for Credit Memos.
Qty returned
Entry Format: For regular Orders or Quotes this field is automatically set to the Quantity Ordered when you add an order and is not changeable with this program.
For Invoice orders, enter the actual quantity shipped, up to 8 whole digits, or 6 numeric digits and 3 decimals, or zero. If you enter zero, the line item Open/Closed Status will automatically be set to Closed.
For Credit Memos only, this field represents the physical quantity returned that you wish to have credited to inventory when the Credit Memo is posted. You may enter up to 8 whole digits, or 6 numeric digits and 3 decimals, or zero, but the value cannot exceed Quantity For Credit.
Comments: This field is only changeable for regular orders (Order Type = O) in Billing, to specify a partial shipment quantity. If you partially ship and backorder the balance of a line item, the Post Invoices program will automatically reset this value to the Quantity Ordered less the Quantity Shipped To Date.
Qty to stock
Entry Format: Up to 8 whole digits, or 6 numeric digits and 3 decimals, or zero, but not exceeding the Quantity To Ship (or the Quantity Returned for a Credit Memo).
Comments: This field is automatically set to the Quantity To Ship if the All items from stock answer on the first order entry screen is Yes (checked). Changes to this field cause the Quantity From WIP to be updated to the Quantity To Ship less the Quantity From Stock.
In Billing Posting, this value will be deducted from the Item Quantity On Hand at the Supplying Warehouse (or added to On Hand if a Credit Memo).
(Quantity From Work-In-Process) or,
(To Work-In-Process if a Credit Memo)
Entry Format: Up to 8 whole digits, or 6 numeric digits and 3 decimals, or zero, but not exceeding the Quantity To Ship (or the Quantity Returned for a Credit Memo).
Comments: This value is automatically set to Quantity To Ship less the Quantity From Stock (or Quantity Returned less Quantity To Stock for a Credit Memo). Changes to this field cause the Quantity From Stock to be updated to the Quantity To Ship less the Quantity From WIP.
In Billing Posting, this part of the Quantity Shipped (or Returned) will not update Quantity On Hand.
Entry Format: Drop down list box choices of Open or Closed.
Comments: When adding a line item, this field is automatically set to Open for Orders, Credit Memo, and Quotes. For Order Type of Invoice it is set to Open, unless you enter zero to Quantity To Ship in which case it is set to Closed.
Closed code (Closed reason code)
Entry Format: TO = Temporarily Out,
DC = Discontinued item, or space.
Comments: When you change the Open/Closed status to Closed, it means you will not ship the balance of the line item Quantity Ordered. You are asked to enter this optional closed reason code. This code may be printed on your invoice to inform the customer why the order balance was not shipped.
Entry Format: Up to 7 numeric digits and 4 decimals, or zero.
Comments: This field is only entered for miscellaneous item numbers (those that begin with a "*"). Otherwise, the value is displayed from the Item Master.
Entry Format: Accept the default List Price displayed, or press <F1> to enter another value of up to 7 numeric digits and 4 decimals, or enter space for "Not applicable".
If the Item Number begins with *, representing a "miscellaneous" item, you will be prompted to enter this value.
Comments: The initial default value displayed when you add a line is either from an Item Special Price record for the Customer or Customer Type and Item, or from the Item Master.
"Special price" will display on the screen if the default price is from the Special Price File.
If you change the List Price to "Not applicable", then the Discount Percent will be set to zero, and you will need to enter the Extended Price for this line item.
Entry Format: Up to 2 numeric digits and 2 decimals or zero. You may also enter 100 in this field for a "No charge" item.
Comment: If the answer is Y to "Apply discounts ?" in the Item Master record, a line Discount Percent, if any, is automatically retrieved and displayed. The Customer Type and Item Product Category are used by the program to look for a matching Discount record on the Price Discount File. If the List Price is from the Special Price file, the Discount Percent will display from the Special Price File. You may modify this the value in this field.
Entry Format: Up to 7 numeric digits and 3 decimals, or zero.
Comments: This value is calculated and displayed as the List Price reduced by the Discount Percent. Press <F1> to change this value.
When you enter a Net Unit Price value, the Discount Percent and Extended Price values are recalculated and redisplayed.
Entry Format: Up to 8 numeric digits and 2 decimals, or zero.
Comment: Entered only if the List Price entry was "Not applicable"; otherwise, it is automatically calculated by the program. For regular Orders, Quotes and Invoice orders Quantity To Ship is used in this calculation. For Credit Memos Quantity Ordered is used.
The following two fields, updated by other programs, are displayed in the lower right section of the line item screen. They will always have zero values when you first add a line item, but may show non-zero values if displayed after activity is posted.
Shown as the Stock Unit of Measure.
Shown as the Stock Unit of Measure.
Item quantities are transferred or issued to the Customer Order line item WIP Quantity At Shipping balance by other programs. This part of the line item Quantity To Ship is no longer allocated and will not be issued from the Quantity On Hand when line item billings are posted.
Entry format: Up to 4 numeric digits and 3 decimals.
This field is automatically set to the Shipping Weight/Unit in the Item Master record.
If the answer is Y to 10. Create shop orders for some sales order items ? in Control information, you can selectively create new Shop Orders (supply orders) directly from the Sales Order (demand order) line items that you enter. You may then use Inventory Management to explode and track those Shop Orders.
The following three fields will be displayed:
Entry Format: Check box where checked is yes and unchecked is no.
If the Item Master record specifies that the item is Purchased or that the item is not controlled, or the Item Number begins with * indicating a "miscellaneous item, this entry defaults to unchecked and you will not be able to change the answer or enter the subsequent two fields.
Default: When you add a line, unchecked is the default.
Validation: If you check this box and there is already a Shop Order on file matching the Sales Order Number, Release Number (if you use Release Numbers), and Item Number for this line item, a message informs you of this condition and the entry reverts to unchecked.
If check the box to the preceding question, enter:
Entry Format: Up to 8 numeric digits.
Default: The default displayed is the Quantity Ordered (converted to the stock unit of measure if the Stock/Price Ratio is not 1.000).
If MRP is licensed, the item is manufactured and you selected to Create shop order, once a quantity is entered the following occurs:
| • | Move the quantity ordered to a work field. |
| • | Check the item master for rules and compute the proper quantity to order. |
| • | If the resulting quantity is greater than 0 the program either checks off or moves Y to the create shop order field. |
| • | If the quantity is greater than 0 AND the Order complete quantity? field in Control information is set to N the program moves the “recommended quantity to order” into the Shop Order Quantity field. If the other new field is set to Y, and it’s determined that a quantity is required, and the recommended quantity to order is less than the line item’s quantity ordered, the program moves the line items quantity ordered to the shop order quantity ordered. |
| • | ALTERNATE CONDITION, if the computed recommended quantity is 0 or less the program does not check off the box to create a shop order. We also don’t prevent the user from doing so. If the user does check off the box on their own, the logic should work as MRP is not used. |
Entry Format: 6 numeric digits in MMDDYY format.
Default: The default displayed is the Ship Sched Date, unless the Ship Schedule Date is "Hold".
When you add a Shop Order, if Manufacturing Job Costing is installed and a Job Master matching the Shop Order Number is not on file, the program asks:
Answer Y if you want to add the cost master which allows reporting of Shop Order costs, otherwise answer N.
If you are changing a previously entered line item for which you had created a Shop Order record, you may change the Shop Order quantity or delete the Shop Order with this program only if the current Shop Order Status is "Open" (Not "Exploded", "Issued" or "Closed"). Also, this program does not allow deletion of Shop Orders posted with a non-zero Quantity Received.
When allowed, you may delete a Shop Order with the Line Item Entry screen by changing the answer for Create shop order from checked to unchecked, or by deleting the Line Item.
After each line item record is added or deleted, running totals of the number of lines entered and the extended prices for the order are displayed. These totals, and the allocated and ordered balances in related item inventory records, are not updated until you press ENTER in response to "Field number to change ?".
If you have just added a split schedule Release, the program then asks if you want to add another release for the same line. Answer Yes to add another release, or answer No to return to Line Number.
If you have just added a split schedule Release beyond the first Release and there are Line Comments on file for the preceding Release, the program asks if you wish to "Repeat comments from previous release ?". If you answer Y, Line Comments are automatically copied to the Release you have just entered.
If the answer to 16. Use order line item comments ? is Y in Control Information, you may press <F6> to add or change Line Comments after you have completed entry or change of the Line Item.
Line comments
Entry Format: Up to 99 lines of 45 alphanumeric characters each, in groups of 10 lines per screen.
When you are done adding or changing line comments, press <F1> to put spaces in a comment field and in subsequent comment fields in the group of 10. To delete all comments for a group of 10, press <F1> when the cursor is at the top comment field.
To display a list of all line item records currently on the order, press <F5> when the cursor is positioned at Line Number. When you have finished adding, changing or deleting line items, press ESC (or TAB) at Line Number to proceed to the order summary screen.
If Lot or Serial Number control applies to the line item and the Order Type is Invoice or Credit Memo, you are prompted to enter detail quantity distributions on a subsequent screen. This additional information is eventually posted to the Lot/Serial Number History File by another program.
The Lot/Serial Number distribution screen displays the Item Number and Description, Stock Quantity To Ship (or Returned), Stock Quantity (remaining) To Distribute, WIP Quantity To Ship (or Returned), and WIP Quantity (remaining) To Distribute. Previous Lot or Serial Number quantity distributions, if any, are also displayed on the bottom section of this entry screen. You must enter detail quantity distributions (to Lot or Serial Numbers) until Stock Quantity To Distribute and WIP Quantity To Distribute are both zero. Then press ESC (or TAB) to exit this screen.
The Lot/Serial Number quantity distribution data you enter are:
Entry Format: Up to 15 alphanumeric characters, or Blank for "Undefined", or <F2> to "display on-hand detail". For Lot Number, the entry consists of the following 3 segments:
Lot/S.O. # Shop Order Number; up to 6 alphanumeric characters. Spaces not allowed.
Lot/Rls # S.O. Release Number, up to 2 numeric digits or space.
Lot/User The program reformats the S.O. # and Release # entries, and adds a "*" character. After the "*", you may add more User assigned identifiers to the Lot Number, or press ENTER to continue.
Validation: For Lot Numbers only: If the Shop Order and Release Number portions of the Lot Number entry do not match an open or closed Shop Order on file for the Item Number, the program warns you about this mismatch but provides the option to proceed.
Comment: If you are distributing a stock quantity and press <F2> to display on-hand detail, you may select the Lot or Serial Number by entering the related 3 digit Sequence Number in the on-hand detail window displayed by the program.
Entry Format: Drop down list box with the choices of Stock or WIP.
Comment: Indicates whether you are distributing the Stock Quantity or WIP Quantity To Ship (or Returned). A default displays if the remaining quantity is not split between Stock and WIP.
Entry Format: Up to 8 whole number digits and 3 decimals, or zero.
Default: For a Serial # control item, 1 is the default. For a Lot # control item, remaining Quantity To Distribute for the designated Stock or WIP category is displayed as the default. Press <F1> if you wish to change the default quantity.
Comments: If the Lot # or Serial # entry matches a displayed previous distribution, this quantity will replace (not add to) the previously entered quantity. A zero quantity entry will therefore delete a previously entered distribution for the same Lot or Serial Number.
Entry Format: Up to 25 alphanumeric characters.
Default: The bill to Customer Name is displayed as the default entry.
Select Save or Save/New buttons to save the Serial/Lot entry.
The program deducts the distribution Quantity from the Stock Quantity To Distribute or WIP Quantity to Distribute. The new balances are then redisplayed, and the cursor returns to the Lot or Serial Number position. When both Quantity To Distribute fields are reduced to zero, you may press ESC (or TAB) at the top entry position to exit the screen. Otherwise, continue entering additional quantity distributions until both Quantity To Distribute fields are zero.
To enter Assortments or "Kits", you must have installed PBS Manufacturing Product Definition & Costing and must have bill of material records on file for the Assortment Item Numbers that you enter.
Fields two through eight of Assortment Item Entry are the same as for line item Entry. You may refer to the Line Item Entry section for the procedure for entering these fields. If the Item Number that you enter does not have a bill of material on file, a message will explain this and you will be prompted to enter another Item Number.
Entry Format: Up to 2 numeric digits and 2 decimals.
Comments: This is an extra discount applied to the assortment line items after the regular line item Discount Percent is applied.
Ship assortment items from stock
Entry Format: Check box where checked is yes and unchecked is no.
Comments: This answer determines if the Quantity From Stock will be set equal to the Quantity Ordered for each assortment line item.
If box is checked to 10. Create shop orders for some sales order items ? in Control Information, you will be asked the following question. A Y answer will cause Shop Orders to be created for Manufactured and controlled line items in the assortment.
Create shop orders
Entry Format: Check box where checked is yes and unchecked is no.
If you checked the box, you are prompted to enter:
Entry Format: 6 numeric digits in MMDDYY format.
Default: The default displayed is the Ship Schedule Date, unless the Ship Schedule Date is "Hold".
A message will inform you how many assortment component line records were automatically created, how many line records could not be created (if any) and the reason, and how many Shop Orders, if any, were created. For an assortment component line record to be created, the component item must be currently effective in the Assortment Bill of Material (not obsolete or not with a future effective date), its Item Master record must specify that it is sold, and the Supplying Warehouse entered for the Assortment must match the Primary Warehouse or a Branch Warehouse Item record for that component.
The Assortment parent Item Number and parent Quantity Ordered are stored in each assortment component line item record created. You will not see the Assortment parent Item Number when an assortment component line record is on the Line Item screen, but (For assortment) will display to the right of the component Item Number. The Assortment parent Item Number and Quantity Ordered are printed on Order Edit Lists, Packing Lists, and Invoices just before the related component line items.
Review Lines
This option is available only in Character mode. The list box displays the lines in Graphical mode.
When you press <F5> at Line Number to review the lines of an order, the following fields are displayed for each line item:
Line Number Schedule Date
Release (if any) Promise Date
Item Number Qty Ordered (or To Credit)
Description Qty to Ship (or Returned)
Supplying Whse Qty Shipped to Date (if any)
Open/Closed Net Unit Price
Closed Code Extended Amount
If there are more lines to display, you are asked "Display more ?". After you have finished with the line review, the program returns to the Line Item entry screen.
The following totals are automatically calculated and displayed at the top of the order summary screen:
CR limit
Customer's credit limit from Customer File.
Customer balance
Sum of customer's Account Balance plus Unposted Balance from the Customer File.
Order total
Extended dollar sales value balance of the order before any total Order Discount, Misc Charges, Freight, and Sales Tax.
Taxable amount
This amount of the Order Total is subject to Sales Tax, but only if the Customer's Tax Code specifies a non-zero tax rate.
The data you enter are:
Entry Format: Up to 2 numeric digits and two decimals, or zero.
Default: If Discount Percent in the Customer record is not zero, it is displayed as the default and you may press <F1> to change that value.
Comments: After this field is entered, the Discounted Net value of the order is calculated and displayed.
Entry Format: Up to 7 numeric digits and 2 decimals with an optional minus sign, or zero. Press <F1> to enter an Allowance Percent for this order.
Comments: If you enter a non-zero amount in this field and the answer to "Distribute misc chrgs ?" in the A/R Control information is checked or Y, the program will prompt you to enter the distribution account for this charge, displaying the Miscellaneous Charges Default Account Number from Control information as the default entry. Accept the default or press <F1> to enter another Account Number.
If you do not distribute Miscellaneous Charges, the account number prompt will not appear on this screen and the Miscellaneous Charges Default Account Number in the Control information will be used as the distribution account.
If you enter a non-zero amount and if the A/R Control information answer to "Calc sls tax on misc chgs ?" is checked or Y, the program will ask if this Miscellaneous Charge is "Taxable ?". Answer Y or N.
Entry Format: Up to 2 numeric digits and 2 decimals.
Comments: If you press <F1> at the Miscellaneous Charges line, then that line is replaced by the Allowance Percent line. You can then enter an Allowance Percent which will be applied to the Order Balance to calculate a deduction (negative) amount. Account and Taxable entries are the same as for Miscellaneous Charges.
Entry Format: Up to 5 numeric digits and 2 decimals, or zero.
Comments: This field is automatically zero for order type O. You may change this value using "Field number to change ?" or in Billing, unless, the F.O.B. for the order is "Free freight", in which case this field will default to zero and you are not allowed to change it.
If you enter a non-zero amount in this field and the answer to "Distribute freight ?" in the Control information is Y, the program will prompt you to enter the distribution account for this charge, displaying the Freight Default Account No. from the Control File as the default entry. Accept the default or press <F1> to enter another Account Number.
If you do not distribute Freight, the account number prompt will not appear on this screen and the Freight Default Account Number in the Control File will be used.
Entry Format: Up to 7 numeric digits and 2 decimals, with an optional minus sign.
Comments: This value is calculated from the Taxable Amount and the Customer Tax Code and automatically displayed.
Entry Format: Up to 7 numeric digits and 2 decimals, with an optional minus sign.
Comments: This value is summed from the Commission Rate and the Extended Amount of each line item and automatically displayed.
If 5. Split order commissions ? in Control Information is Y, then you are allowed to distribute the commission amount to up to three sales reps.
Entry Format: Up to 3 lines of Sales Rep Numbers and Commission Amounts. Sales Rep Number is up to 3 alphanumeric characters, and Commission Amounts are up to 7 numeric digits and 2 decimals.
The next two fields are initially bypassed, but may be entered from "Field number to change ?".
Entry Format: Up to 7 numeric digits and 2 decimals. Zero allowed, but minus sign not allowed.
Comments: Enter the amount of cash down-payment received prior to shipment, if any. When the order is later invoiced, the Invoice Balance Due amount is calculated by deducting this amount from the Total Billed amount.
Customer Order Processing does not post the Cash Received amount entered here to Accounts Receivable. It is assumed that you separately entered any such cash amount to Accounts Receivable.
Entry Format: Up to 6 numeric digits, or spaces for "Cash".
This field is automatically bypassed if the previous Cash Received entry is zero.
Entry Format: Up to 4 lines of 30 alphanumeric characters each, or space. When you first enter these lines in Add, entry of all spaces to a line will cause the program to bypass any subsequent comment lines. You will be allowed to modify the Comments for a regular Order (Order Type is O) when it is later selected for billing and they will then print as Invoice Comments.
If you entered SEE BELOW in Customer PO Number on the first order entry screen, you are prompted to enter PO Number, up to 25 alphanumeric characters on the first Order Comment line.
If the customer type on this order matches a record on the Default Order Comments file or there is a record on the Default Order Comments file for "All" customer types, the default comments will be automatically entered and displayed when you add an order.
Entry Check box where checked is yes and unchecked is no. The automatic default for Orders and Invoices is checked. For Quotes or Credit Memos you will not be able to enter this field.
Comment: When you later select the "Print packing lists" program, that program prints Packing Lists for all customer orders with a checked for this field and automatically changes this answer to unchecked when you approve the printed Packing Lists. If you later need to reprint a Packing List, you may reset this field to checked. When a Quote is converted to an order, this field is automatically changed to checked.
If 8. Certifications used ? is Y in Control Information and Order Type is Order or Invoice the program asks:
Entry Format: Check box where checked is yes and unchecked is no.
If Cert required is checked then you are prompted to enter:
Entry Format: Up to 2 numeric digits.
Validation: Must match a Certification Number in the Standard Certification File.
The following entry is requested only if Order Type is Invoice, and the answer is Y to 9. Shipping labels used ? in Control information.
Entry Format: Up to 2 numeric digits, or zero.
If Order Type is Invoice or Credit Memo and I/M Control Information indicates you use Multiple Stock Locations and some line items will be Shipped From Stock (or Returned To Stock), you are prompted to enter:
Return to stock locn code
Entry Format: Up to 5 alphanumeric characters, or Blank = "Undefined".
Comments: All line item quantities shipped from stock will be disbursed from this one location, or all credit quantities returned to stock will be returned to this location, when invoices are posted by another program. You may use "Relocate items" on the menu for "Inventory transactions" to move the items to or from this location.
When deleting an order, if the order has line items which were previously closed, then those line items will remain in the Closed Items Order History File. Any line item which is open, but has a non-zero shipments-to-date, will be automatically closed and the line item will remain in the Closed Items Order History File as well. Closed line records remain on file until you purge them with the Purge Detail History function.
Use this program to create new Orders by copying regular orders or quotations (i.e. Order Type is O or Q) already on file, after entering new variable data to be replaced in the order being copied.
When the new record is created, any applicable Sales Rep Commissions are recomputed based on the new Sales Rep Number and Customer Type. However, line item prices and total order discount are not changed from those on the order/quotation being copied, even if Customer Number and/or Customer Type for the new record are different from the order/quotation being copied.
Select
Copy ordersfrom the Sales orders menu.
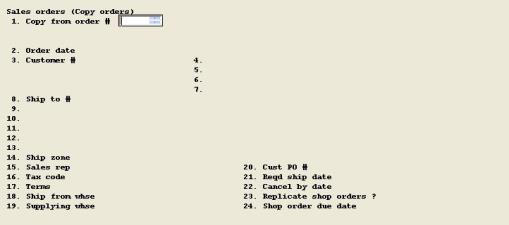
The data you enter are:
1. Copy from order #
Entry Format: Up to 6 numeric digits.
Validation: Must match an order on file that is not a Credit Memo, and is not partially shipped and backordered. If found, the Order Date, Order Type, Customer Number, Customer Required Ship Date, Ship To Number (if any), and P.O. Number of the order to be copied are displayed.
Copy to order #
(Automatically assigned from C/O Control)
The following data pertain to the new order being created, replacing data in the order being copied. Entry formats and procedures are the same as explained for the same field names in a preceding section of this chapter.
2. Order date
3. Customer #
4.-7. Customer name and address lines
8. Ship to number
9.-13. Ship to name and address lines
14. Ship to zone (or sixth Ship-to name and address line)
15. Sales rep (Sales Rep Number)
16. Tax code
17. Terms
18. Ship from whse
19. Supplying whse
20. Cust PO #
21. Reqd ship date
22. Cancel by date
If the answer is Y to "Create shop orders for some sales order items ?" in Control Information, and Order Type is not Quote, you are requested to answer:
23. Replicate shop orders ?
Y or N
Answer Y if you wish any shop orders created for the order you are copying to be duplicated for the new order, except for changing the Shop Order Number and Shop Order Due Date. If you answer Y, you are prompted to enter in MMDDYY format.
24. Shop order due date
(For new shop orders to be created)
Revise your entries, as needed, and the program creates the new order/quotation and any related shop orders, if requested.
This program prints an edit list of orders on file, for a range of Order Numbers and range of Order Dates that you specify. Grand total dollar amounts for all of the orders listed are also printed.
Note that any regular Orders (Type = Order) that are selected for billing will not be included on the Order Edit List. After such regular Orders are invoiced and posted in Billing, any partially shipped backorders may then be printed on the Order Edit List with updated quantity balances.
See an Order Edit List example in the Sample Reports appendix.
Select
Order edit listfrom the Sales orders menu.
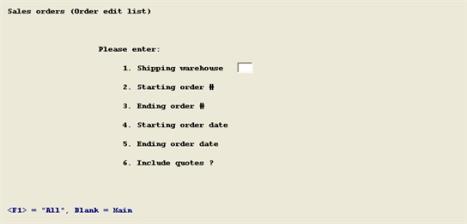
The data you enter are:
1. Shipping warehouse
Up to 2 alphanumeric characters,
Blank = "Main", or <F1> = "All".
2. Starting order #
Up to 6 numeric digits, or <F1> = "All".
3. Ending order #
Up to 6 numeric digits, or Blank = Starting value.
4. Starting order date
6 numeric digits in MMDDYY format, or <F1> = "All".
5. Ending order date
6 numeric digits in MMDDYY format, or Blank = Starting value.
6. Include quotes ?
Y or N.
If you answer Y, the program asks:
Quotes only ?
Y or N.
Field number to change ?
Make any changes or select <Enter> to print the edit list.
Selection of a customer order for Packing List printing is done in the Sales Order, Enter summary screen. Billing automatically selects partially shipped Orders with backordered items for Packing List printing when the partial billings are posted.
If the Control Information answer is N to "Select order lines for packing lists ?", Packing Lists are printed for orders with a Y answer in the "Print packing list ?" field. With this option, the Quantity printed on Packing Lists is the quantity balance due (original Quantity Ordered less Quantity Shipped to Date) and all order Line Items that are still open will print.
If your Control Information answer is Y to "Select order lines for packing lists ?", you will see a menu for 1. Select order lines, and 2. Print. With this option, you must also use the "Select order lines" program to specify the orders, order line items, and quantities to be printed.
Select
Packing listsfrom the Sales orders menu.
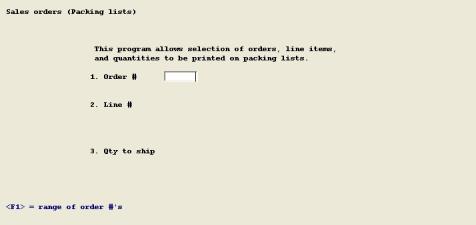
The fields you enter are:
1. Order #
Up to 6 numeric digits, or
<F1> = range of order #'s
2. Line #
Up to 3 digits, or <F1> = next, or
<F2> = Select qty due for all open lines.
This field defaults to "All" when a range of orders is entered.
If you use <F2> to select all open line items, the program displays how many open lines are selected.
If you request a specific line item, its Ship Schedule Date, Item Number, Description, Quantity Due, and the current print selection status display.
3. Qty to ship
Up to 8 numeric digits and 3 decimals. Defaults to "Quantity Due", but may be changed.
This field defaults to "Quantity due" when a range of orders is entered.
If the order record does not indicate a Packing list should be printed the following message displays: "Packing list printing not selected for Order # _____, OK to select now ?". The default is Y.
For specifically requested line items, you are asked "Select this line ?". If you answer Y, you are asked if you wish to change "Qty to ship" (the packing list Quantity to be printed). Answer Y to change the quantity, or N when the quantity is correct.
If you answer N to "Select this line ?", the line item will not be included on the packing list.
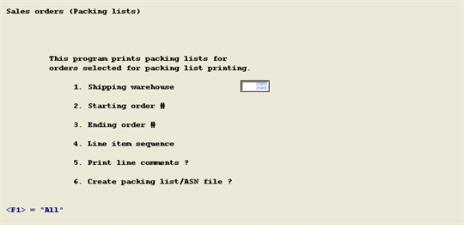
The data you enter are:
1. Shipping Warehouse
Up to 2 alphanumeric characters, or
Blank = "Main", or <F1> = "All".
2. Starting Order #
Up to 6 numeric digits.
3. Ending Order #
up to 6 numeric digits. Press Enter to default to the Starting Order #.
4. Line item sequence
O for Order Line Number, or I for Item Number
5. Print line comments ?
Y or N.
If the answer to "Use line item comments ?" is Y in Control Information, you may answer Y to include any Line Item Comments on the Packing List, or N to exclude these comments. This question pertains to Line Comments only and not to any Order Summary Comments which, if entered, will always print at the bottom of Packing Lists.
6. Create Packing List/ASN File?
Answer “Y” to create a text file containing information related to orders being shipped while packing lists are being printed. Answer “N” to simply print the packing lists.
A yes answer will result in a window that prompts for information related to the data export. This includes the following:
1. File Device:
Enter the drive letter where the text file should be saved. This is typically going to be the same drive letter where your PBS system is installed.
2. File Name:
Though you can choose any file name, a default file name is provided.
3. File Extension:
Similar to file name, you can opt to change the extension but a default of TXT is provided.
4. File Open Method ?
You may opt to create a new file (Option C) or you may opt to append the existing file (Option A). If you are trying to collect all orders for the day and printing packing lists throughout the day, you should use the Append option as this will add any new orders printed to the text file. Use the Create option to initialize a new file (removes all existing records in the file).
Field number to change ?
Make any changes or select <Enter> to continue.
The program then asks you to:
Mount forms on printer & type DONE when ready
Type DONE to proceed, or press ESC (or TAB) to exit the program.
The program next asks:
Print alignment ?
Answer Y to print alignment characters on one form, or answer N to print the Packing Lists. After Packing Lists are printed, the program asks
Packing lists printed OK ?
If you answer Y, the program changes the "Print packing list ?" answer to N in all related order records and returns you to the preceding menu.
If you respond N to the printed OK question, you are given the option to reprint Packing Lists immediately or exit to the menu.
You may print Acknowledgments for a specific shipping warehouse or for all warehouses for a range of orders and order dates.
Select
Acknowledgments from the Sales orders menu.
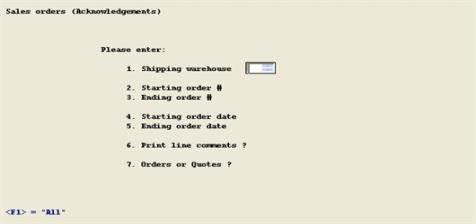
The data you enter are:
1. Shipping warehouse
Up to 2 alphanumeric characters, or
Blank = "Main", or <F1> = "All".
2. Starting order #
Up to 6 numeric digits, or <F1> for "All".
3. Ending order #
Up to 6 numeric digits, or Blank = Starting value.
4. Starting order date
6 numeric digits in MMDDYY format, or <F1> = "All".
5. Ending order date
6 numeric digits in MMDDYY format, or Blank = Starting value.
6. Print line comments ?
Y or N
If the answer to "Use line item comments ?" is Y in Control Information, you may answer Y to include any Line Item Comments on the acknowledgments, or N to exclude these comments. This question pertains to Line Comments only and not to any Order Summary Comments which, if entered, will always print at the bottom of acknowledgments.
7. Orders or Quotes ?
O = Orders, Q = Quotes
To print Sales Order Quotations (Order Type = Q), select Q, otherwise, select O to print standard Acknowledgments.
The program then asks you to "Mount forms on printer & type DONE when ready". Type DONE to proceed, or press ESC (or TAB) to exit the program.
The program next asks "Print alignment ?". Answer Y to print alignment characters on one form, or answer N to print the documents.
When you print a Sales Order Accomplishment for an order that has been partially shipped, only the balances remaining on the order will be printed and a Backorder Number suffix will print after the Order Number.
You may select lines for an order and a specific line and a range of orders to be printed on the bill of lading. The second function prints a bill of lading for a specific shipping warehouse or for all warehouses and for a range of orders.
Select
Billing of lading from the Sales orders menu.
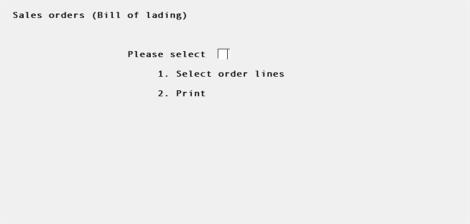
Here you may select:
Please select
You may enter 1 to select the lines that are to print on the bill of lading or 2 to print the bill of lading.
To skip to the print screen select Print Bills of Lading. If you select 1, then the following screen displays:
Order selection screen
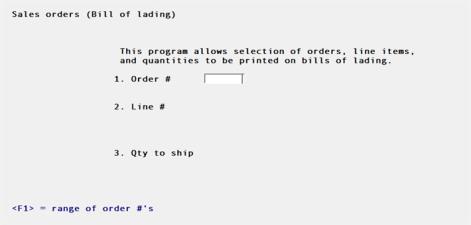
Enter the following fields:
1. Order #
Up to 6 numeric digits, or <F1> to enter a range of orders.
If you select a range or orders, then the next 2 fields cannot be entered.
2. Line #
This field can only be entered if you entered one order in the previous field.
Select <F1> to view the next line or <F2> to select quantity due for all open lines.
If you select <F1>, then the question "Select this line ?" displays. Enter Y to select the line or N to not select the line are start the selection process over.
If the line is closed a message displays indicating this.
If you select one line, then the question "Change quantity ?" displays. Select Y allows you to change the quantity in the Qty to ship field.
3. Qty to ship
This field can only be entered if you selected one order and one line and you entered Y to change the quantity. Enter the quantity to ship.
If you enter an quantity that is more than on the order, then the question "Qty entered exceeds qty due - OK to proceed ?" Enter Y to proceed or N to re-enter the quantity.
Enter the following fields:
1. Shipping warehouse
Entry Format: Up to 2 alphanumeric characters, or Blank = "Main" warehouse.
Enter a warehouse or <F1> for all warehouses.
2. Starting order #
Entry format: Up to 6 numeric digits.
Enter the starting order number or <F1> for all orders.
3. Ending order #
If you entered <F1> in the starting order number field, this field cannot be entered.
Entry format: Up to 6 numeric digits.
Enter the ending order number.
4. Line item sequence
Enter O for order number sequence or I for item number sequence.
5. Print line comments ?
Enter Y to print the line comments or N to not print them.
6. Send to vendor
This field is can only be entered if you entered the starting and ending order as the same number.
Enter Y to send the bill of lading to the vendor or N to not send it to a vendor. If you select to send it to a vendor, then the vendor address prints on the bill.
7. P.O. number or vendor number
Enter P to select a purchase order number or V to select a vendor number in the next field.
8. P.O. number or Vendor number
Depending on what you selected in field 7, enter the P.O. number or vendor number.
Select a printer.
After printing the bills of lading you are asked "Bills of lading printed OK ? " Enter Y if yes or N if they did not print okay. If you entered N, then you are asked "Restart bills of lading printing or return to menu ?". Enter R to restart or M to return to the menu.